
I’ve recycle my old computer into a proxmox hypervisor. That’s mostly to meet a need of being able to deploy easily linux instances for testing purpose.
For the moment I barely scratched the surface of this, and there is more to come on on this topic.
Why Proxmox ?
Proxmox is compatible with most customer grade hardware, you won’t need to have an huge system configuration to start using it.
That’s an opensource and free to use type 1 hypervisor. A type one hypervisor, is basically a minimal OS with only what it needs to create/run/manage virtual machines. It’s super lightweight, allowing you to use the most of your resources for the guests.
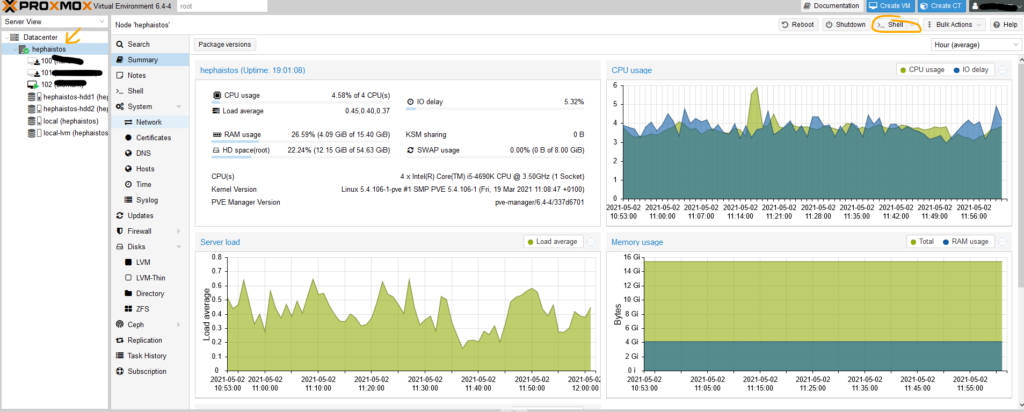
The Hardware
I did not bought anything for this setup, I used an unused computer. So really low specs but that’s enough to experiment.
- CPU: Intel Core i5-4690K @ 3.5GHz
- Ram: 16GB
- SSD: Kingston SV300S37A240G
- HDD: 2x Toshiba DT01ACA100
- Network: 1GBps on-boarded card
- GPU: GTX-1070
As you see it’s nothing fancy, I have a SSD to run the system, 2 hard drives so I’ll have enough space to set multiple volumes.
And a GPU, so I can setup guests to use it.
Important: You must have a wired network card AND use it, Proxmox won’t setup with WiFi
I won’t go through the install process, it’s really straight forward, just make sure you have Virtualization and VT-d enable in your bios settings.
Post-install tuning
If you have some interesting hardware, like let’s say a GPU for example, it will be useful to enable IOMMU (Input/Output Memory Management Unit) so you can delegate some hardware to you guests
With the bios correctly setup (Virtualization and VT-d enabled), the following steps should do the trick
Go to your host shell :
You will have to update your grub settings :
vi /etc/default/grub
Find the line GRUB_CMDLINE_LINUX_DEFAULT="quiet"
Replace if by
GRUB_CMDLINE_LINUX_DEFAULT="quiet intel_iommu=on"for Intel CPUGRUB_CMDLINE_LINUX_DEFAULT="queit amd_iommu=on"for AMD CPU
Then update grub :
update-grub
And reboot
Check if everything is set with
dmesg | grep -e DMAR -e IOMMU
You should get a return like this :
root@hephaistos:~# dmesg | grep -e DMAR -e IOMMU[ 0.008408] ACPI: DMAR 0x000000009CDE78C8 0000B8 (v01 INTEL BDW 00000001 INTL 00000001)
[ 0.065014] DMAR: IOMMU enabled
[ 0.150071] DMAR: Host address width 39
[ 0.150072] DMAR: DRHD base: 0x000000fed90000 flags: 0x0
[ 0.150075] DMAR: dmar0: reg_base_addr fed90000 ver 1:0 cap c0000020660462 ecap f0101a
[ 0.150076] DMAR: DRHD base: 0x000000fed91000 flags: 0x1
[ 0.150078] DMAR: dmar1: reg_base_addr fed91000 ver 1:0 cap d2008c20660462 ecap f010da
[ 0.150079] DMAR: RMRR base: 0x0000009cd76000 end: 0x0000009cd83fff
[ 0.150079] DMAR: RMRR base: 0x0000009f000000 end: 0x000000af1fffff
[ 0.150081] DMAR-IR: IOAPIC id 8 under DRHD base 0xfed91000 IOMMU 1
[ 0.150082] DMAR-IR: HPET id 0 under DRHD base 0xfed91000
[ 0.150082] DMAR-IR: x2apic is disabled because BIOS sets x2apic opt out bit.
[ 0.150083] DMAR-IR: Use 'intremap=no_x2apic_optout' to override the BIOS setting.
[ 0.150619] DMAR-IR: Enabled IRQ remapping in xapic mode
[ 0.894363] DMAR: No ATSR found
[ 0.894400] DMAR: dmar0: Using Queued invalidation
[ 0.894404] DMAR: dmar1: Using Queued invalidation
[ 0.985044] DMAR: Intel(R) Virtualization Technology for Directed I/O
[ 4.278230] i915 0000:00:02.0: DMAR active, disabling use of stolen memory
If it’s empty, either your bios is not configured well or your system don’t support IOMMU
Then setup the kernel modules
vim /etc/modules
Add the following lines:
vfio
vfio_iommu_type1
vfio_pci
vfio_virqfd
Update initramfs and reboot
update-initramfs -u -k all
Last check with
dmesg | grep "remapping"
Again you should have a non empty return
root@hephaistos:~# dmesg | grep 'remapping'
[ 0.150619] DMAR-IR: Enabled IRQ remapping in xapic mode
To allow a virtual machine to use any PCI device, you’ll then have to add it to the VM in the hardware menu
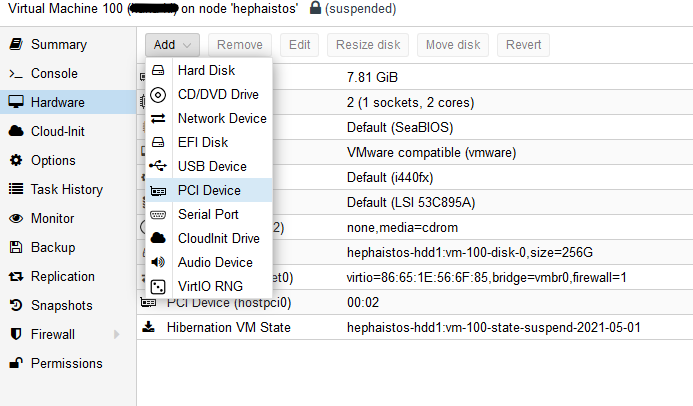
And there you are, a virtual machine with real GPU power that can be used for media encoding, CUDA calculations or cloud gaming.
The next topic will most certainly on how to setup firewall and security groups.