
What’s a VLan?
VLan stands for Virtual Local Area Network (thanks captain obvious). It’s a way to convey multiple LAN over the same cables (for an over simplified view).
You can imagine that your LAN is a bit like a metro line with each station is a device attached to it. Each VLan will be another line that will share some station with the other but you’ll need a different pass to access each line.
Why is this useful?
First use is to have an easier administration of your network: each VLan will have a different subnet, therefore it will have a different set of IP leases for DHCP. This also means that for jumping from one VLan to another you’ll need to go to the router (keep this in mind).
For security this also means that a device on one VLan have no way to know the network address of the other VLan. If a device on a VLan is compromised, it won’t have the direct knowledge on how to access devices for an other VLan.
To go back to the metro analogy, it’s like if you have a map of the line you’re in, but no knowledge of if there is another line nor what it looks like. The router will be also the metro crew who will check your pass and tell you if there are other lines.
In short: it allows you to isolate different parts of your network from each other.
How to setup VLan?
I’ll cover the technical part of this for edge router and ubiquity switches, if you ask nicely I’ll check my old routers/switches to give you other specific details but it’s quite easy to find the options and setup once you know what you want to setup.
Step 1: the plan:
Before doing anything you need a plan: what are the devices you want to group together? how do they connect? how many are they?
I’ll give you a standard plan, adapt it however you feel, it’s just to drop down the abstraction:
- VLan 1/Default: Infrastructure: Better Keep the router, and switches, and WiFi access point together with nothing else inside.
- VLan 2: Data: This will be your main Lan, where your computers are, maybe also your smartphone and consoles (I encourage you to split Lan and media devices, but we’ll keep it simple here).
- VLan 3: Utility: Do you have any network printer? Maybe 3D printers? That’s where they’ll go.
- VLan 5: Guest: Do the friends that comes home what to use the WiFi, give them their own Vlan, isolate the devices in it from each other. You don’t know their computer, their might carry worms, viruses, any kind of malware.
- VLan 8: IOT: Do you think IOT devices are secured? They’re not.Do you think IOT provider respect your privacy, and will continue? Personally I don’t. Put them away, isolate them.
You can add or remove any of these a you wish, but we’re on a nice example of what can be done. Note that VLan 1 is also the default VLan you will use, this way when you plug a new device on your network, you’ll just have to keep this one untagged.
So each VLan will have to have its subnet (I assume here you know what a subnet here, but I plan to make a short video about this soon, it will be in french, but I’ll subtitle it in english as well, just part of another project). To choose the subnet, I’ll assume your ISP gives you a router that already creates a LAN in the class C Private IP (you know 192.168.x.y). We don’t want to conflict with it, so let’s go to another class, I like private Class A it’s easy to remember. So each our VLan will have 10.0.x.0/24 as network address.
We’ll end up with something like:
| VLan ID | Name | Subnet | Router | Range |
|---|---|---|---|---|
| 1/Default | Infrastructure | 10.0.1.0/24 | 10.0.1.1 | 10.0.1.2-10.0.1.254 |
| 2 | Data | 10.0.2.0/24 | 10.0.2.1 | 10.0.2.2-10.0.2.254 |
| 3 | Utility | 10.0.3.0/24 | 10.0.3.1 | 10.0.3.2-10.0.3.254 |
| 5 | Guest | 10.0.5.0/24 | 10.0.5.1 | 10.0.5.2-10.0.5.254 |
| 8 | IOT | 10.0.8.0/24 | 10.0.8.0 | 10.0.8.2-10.0.8.254 |
Step 2: Setup the Router:
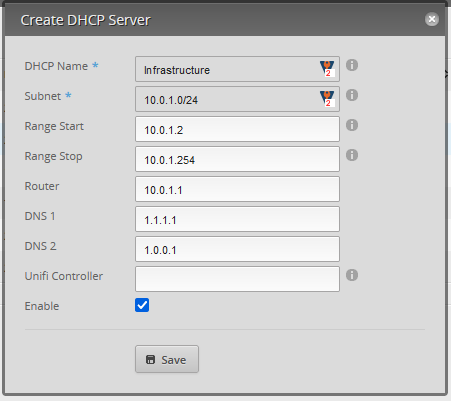
First you’ll have to define your DHCP Leases:
- On your Edge Router web interface go to Services->DHCP Servers
- Add DHCP server
- Fill In DHCP Name, Subnet, Range, Router, DNS (I like to use cloudflare 1.1.1.1)
- Then go to dashboard
- Add Interface -> Add VLAN (Except for the default, you’ll use the interface directly)
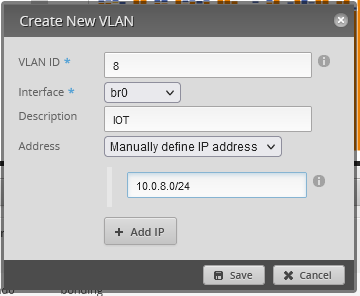
If like me you are using a bond interface, you’ll have to add the VLan using the Config Tree or the CLI (up to version 2.0.9-hotfix.2)
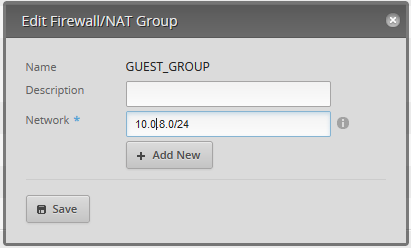
- Go to Firewall/NAT -> Firewall/Nat Groups
- Add Group, Name them GROUP_<VLANNAME>, Group Type: Network Group
- Action->Edit->Set the Network
Almost Done, now the Firewall Policies, you’ll need to creates _IN and _LOCAL rules for guest and IOT.
_IN Rules are used to manage what traffic is allow to come from these interface to anywhere else (including internet).
- Add a Ruleset Named Isolated_IN, Default Action: Drop, Interfaces:
- br0.8, Direction: IN
- br0.5, Direction: IN
- Add new Rules:
| Order | Basic Tab | Advanced Tab | Source Tab | Destination Tab |
|---|---|---|---|---|
| 1 | Description: Allow Established Enabled Action: Accept Protocol: All Protocols | Sate: Established, Related | ||
| 2 | Description: Deny Invalid Enabled Action: Drop Protocol: All Protocols | State: Invalid | ||
| 3 | Description: Block Lan Enabled Action: Drop Protocol: All Protocols | Network Group: DATA_GROUP | ||
| 4 | Description: Block Infrastructure Enabled Action: Drop Protocol: All Protocols | Network Group: INFRASTRUCTURE_GOUP |
- Add Ruleset named Isolated_LOCAL Default Action: Accept, Interfaces:
- br0.8, Direction: LOCAL
- br0.5, Direction: LOCAL
- Add Rules:
1
| Order | Basic Tab | Advanced Tab | Source Tab | Destination Tab |
|---|---|---|---|---|
| 1 | Description: Allow DHCP Action: Accept Protocol: UDP | Port: 68 | Port: 67 | |
Good, firewall is set, but if you connect to one of these VLAN and try to access the web interface of the router from here, it will work, so last step:
- Go to Config Tree
- Open: Service/gui
- Click Add on listen-address
- Fill: 10.0.1.1
- Open: Service/ssh
- Click Add on listen-address
- Fill: 10.0.1.1
- Click Preview and Apply Changes
There you are, you VLan are setup in the router.
Step 3: Unify Controller
Here you’ll have to go to your Unify Control that need to be in the Infrastructure VLan to discover your devices.
- Go In Settings
- Advanced Features
- Add network Isolation and create all your VLans (You already have your default Infrastructure VLan set in the networks section, so no need to create it)

This created the same values on switch ports
- Create an extra VLan named BlackHole, VLAN ID 13, Enable DHCP Guarding with Trusted DHCP Server = 0.0.0.0
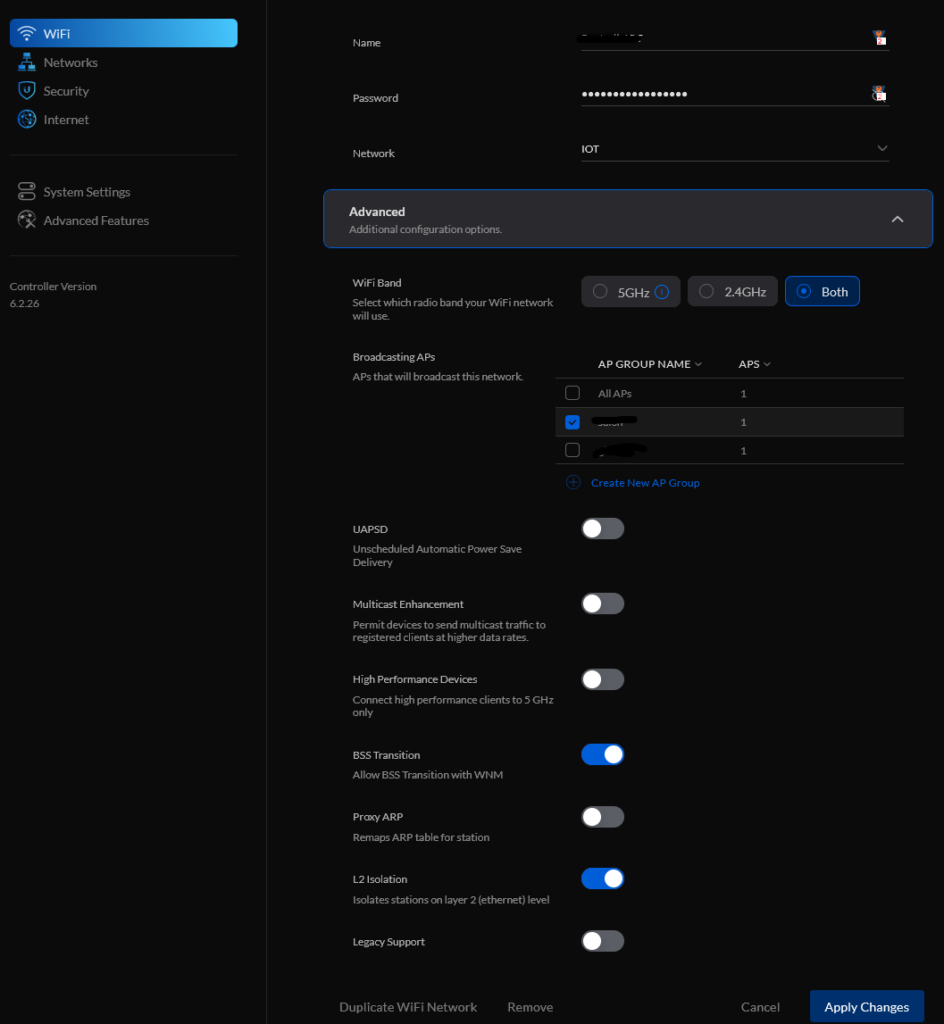
- Go to Settings -> WiFi
- Add New WiFi Network (For Data, IOT and Guest)
- Set the Name/Password and Network
- In Advance: Enable L2 Isolation
- Leave AP Group Name to: All AP
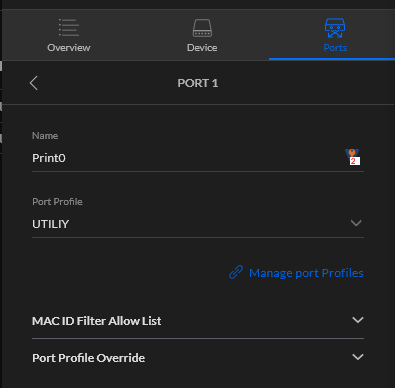
- Then Go to Devices
- Select your Wired Swtich (If any)
- For each port, select the Port Profile Matching the one you want
- For the one attached to your WiFi AP select All
- For all Unused Ports Select BlackHole
There you go, everything is set.
Side notes:
Here you are set to a basic level, you can use Guest WiFi AP, but it will require extra setup I’ll cover later on a post dedicated to Guest Portals.
Also, I’ld like to thanks kitty who helped me find out most of these configurations.
There is a lot more to cover on the Lan Security topic, so stay tune for further information/tutorial on this topic.
If you have some you want to prioritize just leave a message in the comments (yes I’ve opened the comments.)

0 Replies to “Secure your Network using VLan”